For C50s V2.0 upgrading, there are system firmware upgrading and smartphone APP upgrading.
1. System firmware upgrading
First, download the firmware to your computer from Tenda official website .The firmware package name is “C50s V2.0 system firmware”. Then use decompressing tool software to decompress the firmware package. The file like “C50sV2.0-ReleaseDate.sw” is system firmware.
Second, go to the web page to upgrade the firmware.
Visit Tenda
official website www.tendacn.com , on the screen top
right corner ![]() ,
input C50s , then click
,
input C50s , then click ![]() to
search. In the “Search Results” list find the C50s Setup Wizard V3.0 download
and install.
to
search. In the “Search Results” list find the C50s Setup Wizard V3.0 download
and install.
Double click TendaSetupWizard icon, run this software, click next according guide info, until to the following page.
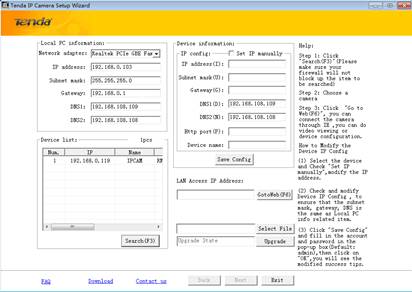
1) As shown on the
picture, click “![]() ”, (please close the firewall and antivirus software in your
computer and make the DHCP server is ON in your Router);
”, (please close the firewall and antivirus software in your
computer and make the DHCP server is ON in your Router);
2) Select the camera from the device list.
3) Click “![]() ”, input admin in both user name and password on the
appearing login window, and then click LOGIN to enter the Web page. As
picture shows below .
”, input admin in both user name and password on the
appearing login window, and then click LOGIN to enter the Web page. As
picture shows below .

4) On web page, click SYSTEM > Device Info. It appears page as below.
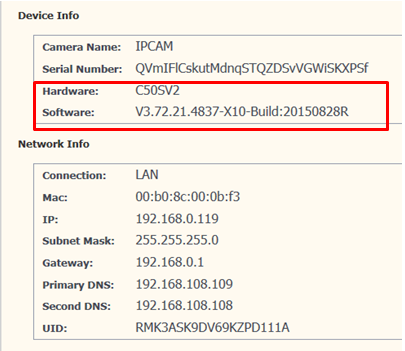
Check the hardware
information, make sure that the camera is C50s V2.0, like ![]() .
.
5) On Web page, click SYSTEM >System Setting > Initializing. It appears page as below.
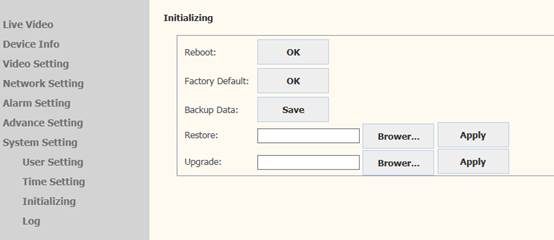
6) Click Brower… of Upgrade, it will pop up a box of path .Choose “C50sV2.0-ReleaseDate.sw” firmware, which you want to upgrade. Then click Apply button to upgrade.
7) During the upgrading process, there is a progress bar that shows current process. Please make sure the internet connection, power supply is working well .Please do nothing just waiting for the process finishing patiently.
8) After upgrading, go back to Device Info page to check if the software information is the one that upgraded. You can check it through the release date of the firmware.
a) If the upgrading is successful, Then go to SYSTEM >System Setting > Initializing page, select Factory Default and click ok to do factory default setting .Note: some new functions can be used only after factory default.
b) If the upgrading is failed, Please check if the firmware selected is correct or not firstly. Then check whether the network connection and power supply is working well or not, or if you did other operation during the upgrading process .After checking that ,redo the upgrading process according to step 6-7 .
9) After doing factory default successful, the camera can be used normally.
2. Smartphone APP Upgrading
2.1Download and install APP by Smartphone
Scan the QR code of APP below to download and install TendaCamera APP.


QR code for TendaCamera APP
iOS device: Also you can search TendaCamera at App Store .
Android device: Also you can search TendaCamera at Google play .Visit tenda official website www.tendacn.com directly, input your model at top right corner to search it.
2.2. Setting and Viewing by Smartphone
Step 1: If the camera is connected to the Router’s LAN port with Ethernet cable, please unplug the Ethernet
cable first.
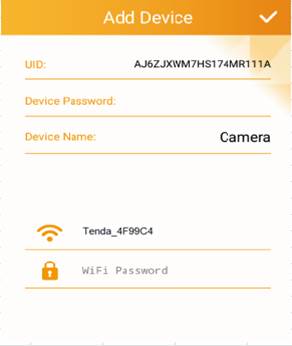
Step2:Add new device
Run TendaCamera APP , click “+” icon of Device, then click WiFi SmartConfig button to scan the QR Code of camera .Then in device password field input the initial password “admin” and in WiFi password field input the Router's wireless password .click "√"to finish adding camera.
![]() Note
Note
If you want to change the camera's WiFi connection , you need to keep pressing the RESET button of the camera about 5 seconds or till to hear the voice of "di" .Wait about 40 seconds .When the light flashes ,you can redo the camera's WiFi smartconfig .
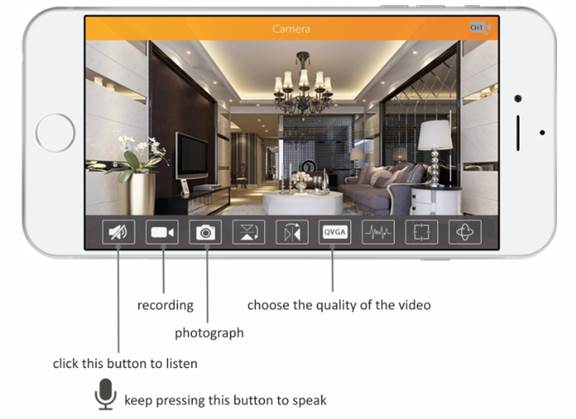
Step 3 : After setting the camera's WiFi connection successfully , you can view live video from the camera and use the functions of listening ,speaking and so on .
Mark: click the top
left icon “![]() ”,you can view
Micro SD Card recording video from “Events”, and view the picture and video
recorded by your phone from “Album”.
”,you can view
Micro SD Card recording video from “Events”, and view the picture and video
recorded by your phone from “Album”.
If WiFi SmartConfig setting dose not success, you can try another way to set the camera's WiFi connection as follow.
1. Press the RESET button of the camera about two seconds ,then open the WiFi setting page of your smart phone, search and connect to the access point of the camera .The name of access point is "IPC-AP-xxx ". Also if there are Ethernet cable, you can connect the camera to Router with cable directly. Meanwhile the smartphone WiFi connect to Router.
![]() Note
Note
In the access point "IPC-AP-xxx", "xxx" means the top eight numbers of the camera UID .If there is no access point of the camera when searchin , please keep pressing the RESET button of the camera about 5 seconds or till to hear the voice of "di" .Wait about 40 seconds .When the light flashes ,press the RESET button again about two seconds .Then search again .
2:Run TendaCamera APP and click “+” icon in “Device”, click LAN Search to search the camera ,click the camera searched and enter the initial password admin.
3.Click Device icon ,then
click the right side icon”![]() ”to
go to the device settings and click WiFi Network to choose the SSID of the WiFi
Router that you want to connect to. Input the WiFi password and save it .
”to
go to the device settings and click WiFi Network to choose the SSID of the WiFi
Router that you want to connect to. Input the WiFi password and save it .
4. When the camera connects to the Router's wireless successfully, the access point of the camera will disappear. The smart phone and camera will reconnect to the Router's WiFi automatically. Then you can view video from the camera and use the functions of listening, speaking and so on.